


目次
筋トレを続けただけで 3kg やせました、那須です。
ときどき AD のユーザを作成したり削除したりとユーザオブジェクトを操作することがあるのですが、手作業でしかも GUI で操作するのが面倒に思えてきました。そこで思いついたのが PowerShell での AD オブジェクト操作です。ただ、PowerShell を実行するにも RDP でログインしたり Session Manager を使ったりして手作業がどうしても必要になります。とにかく GUI で操作したりコマンド実行したりすることをなるべく避けたいので何かいい案はないかと調べていたら、Systems Manager Automation(以降、SSM Automation)が目に止まりました。
SSM Automation だと、作業前に上長から承認を得るフローを作成したり他の作業もフローに組み込んだりして、一連の作業を 1 つのドキュメントに定義できます。これで手作業はなくなるかな、と思ってやってみたら思わぬところでつまづいたので、そのことについてお伝えします。
SSM Automation の詳細は↓このドキュメントを見てください。
https://docs.aws.amazon.com/systems-manager/latest/userguide/systems-manager-automation.html
やりたいこと
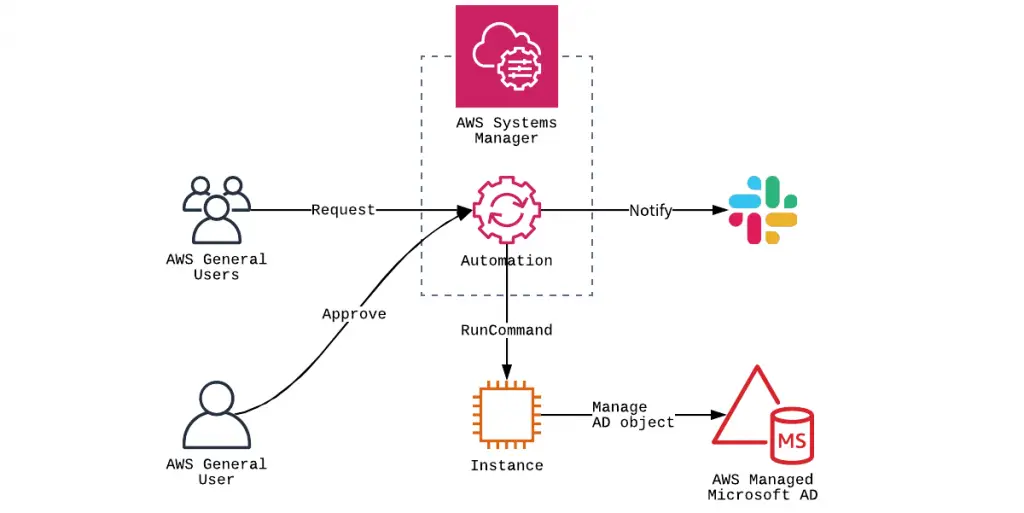
AD ユーザオブジェクトを担当者が勝手に操作するとよくない場面の方が多いと思いますので、以下のような流れを実行するフローを作りたいと思いました。
1. 申請者が SSM Automation ドキュメントから Automation を実行する。
2. Automation が AD 管理者や申請者の上長に承認依頼の連絡を送信する。
3. 承認されたら AD ユーザオブジェクトの作成や削除を自動実行する。
4. メールや Slack 等のチャットに結果を通知する。
申請者が Automation を実行するのは AWS マネジメントコンソールからにしましたが、Slack から Bot を使って実行したり別の Web を作ってそこから実行するようにする方がいいのかなとは思いました。
(今回はそこまでやってません)
上記の流れを図にすると以下のようになります。

SSM Automation の設定内容
ドキュメントのコンテンツは以下のようにしました。
承認依頼を上長に送信して、承認が得られれば AD ユーザを作成する流れです。
 description: 省略
schemaVersion: '0.3'
parameters:
  Username:
    type: String
    description: 追加するユーザ名を指定します。
  EmailAddress:
    type: String
    description: 追加するユーザのメールアドレスを指定します。
  Messages:
    type: String
    description: 作業承認依頼の概要を記載します。
mainSteps:
  - name: Approve
    action: 'aws:approve'
    inputs:
      Approvers:
        - 'arn:aws:sts::111111111111:assumed-role/role_name/manager'
      NotificationArn: 'arn:aws:sns:us-west-2:111111111111:email'
      Message: '{{ Messages }}'
    outputs:
      - Name: Comment
        Selector: $
        Type: MapList
  - name: AddADUser
    action: 'aws:runCommand'
    inputs:
      DocumentName: AWS-RunPowerShellScript
      InstanceIds:
        - i-xxxxxxxxxxxxxxxxx
      Parameters:
        workingDirectory: 'C:\scripts'
        commands:
          - '. C:\scripts\function.ps1'
          - '. C:\scripts\parameters.ps1'
          - >-
            $Credential = CreateCredential -User $User -PasswordFile
            $PasswordFile
          - |-
            try {
              $Password = GeneratePassword
              New-ADUser {{ Username }} `
                -Path "OU=Users,OU=nasu-ad,DC=nasu-ad,DC=test" `
                -AccountPassword (ConvertTo-SecureString -AsPlainText $Password -Force) `
                -PasswordNeverExpires $true -Enabled $true -Credential $Credential
              Get-ADUser {{ Username }} -Credential $Credential
            }
            catch {
              Write-Output "Creating the user {{ Username }} failed."
              $payload = @{
                attachments = @(
                  @{
                    color  = "danger"
                    title = "Creating the user {{ Username }} failed.";
                    text = $error[0].Exception.Message
                  }
                )
              } | ConvertTo-Json
              NotifyToSlack -SlackUrl $SlackUrl -Payload $payload
              throw
            }
          - |-
            $payload = @{
              attachments = @(
                @{
                  color  = "good"
                  title = "Creating the user {{ Username }} finished successfully.";
                  text = "No detail."
                }
              )
            } | ConvertTo-Json
          - NotifyToSlack -SlackUrl $SlackUrl -Payload $payload
          - SendEmailToAddedUser -To {{EmailAddress}} -Username {{Username}} -Password $Password
    description: Add a AD user object.
parameters.ps1 は実行に必要な固定パラメータを入れています。
function.ps1 の中身は以下のようにしました。
 function CreateCredential {
    param ([string]$User, [string]$PasswordFile)
    $SecurePassword = Get-Content $PasswordFile | ConvertTo-SecureString
    return New-Object System.Management.Automation.PSCredential $User, $SecurePassword
}

function NotifyToSlack {
    param ([string]$SlackUrl, [string]$Payload)
    $body = [System.Text.Encoding]::UTF8.GetBytes($Payload)
    Invoke-RestMethod -Uri $SlackUrl -Method Post -Body $body
}

function GeneratePassword {
    Add-type -AssemblyName System.Web
    return [System.Web.Security.Membership]::GeneratePassword(16, 3)
}

function SendEmailToAddedUser {
    param (
        [string]$To, [string]$Username, [string]$Password
    )
    $from = "xxxx@beex-inc.com"
    $smtp = "127.0.0.1"
    $subject = "ADユーザ登録完了のご連絡"
    [string]$body = @()
    $body += "ユーザ登録が完了しました。`n"
    $body += "以下の情報でご利用いただけます。`n`n"
    $body += "ユーザ名: $Username `n"
    $body += "パスワード: $password"
    Send-MailMessage -To $To -From $from -SmtpServer $smtp -Subject $subject -Body $body -Encoding ([System.Text.Encoding]::UTF8)
}
パスワードファイルの作成は最初に 1 回すれば OK です。以下のコマンドで作成しました。
 $Credential = Get-Credential
$Credential.Password | ConvertFrom-SecureString | Set-Content C:\Users\Administrator\securepass.txt
つまづいたこと
まず上記の設定で Automation を実行すると、以下のようなエラーになりました。
 ConvertTo-SecureString : The system cannot find the path specified.
At C:\ProgramData\Amazon\SSM\InstanceData\i-xxxxxxxxxxxxxxxxx\document\orchestration\f4dde924-194b-4a74-afd5-xxxxxxxxx
18\awsrunPowerShellScript\0.awsrunPowerShellScript\_script.ps1:3 char:51
+ ... $SecurePassword = Get-Content $PasswordFile | ConvertTo-SecureString
+ ~~~~~~~~~~~~~~~~~~~~~~
+ CategoryInfo : InvalidArgument: (:) [ConvertTo-SecureString], CryptographicException
+ FullyQualifiedErrorId : ImportSecureString_InvalidArgument_CryptographicError,Microsoft.PowerShell.Commands.Conv
ertToSecureStringCommand
New-Object : Exception calling ".ctor" with "2" argument(s): "Cannot process argument because the value of argument
"password" is null. Change the value of argument "password" to a non-null value."
At C:\ProgramData\Amazon\SSM\InstanceData\i-xxxxxxxxxxxxxxxxx\document\orchestration\f4dde924-194b-4a74-afd5-xxxxxxxxx
18\awsrunPowerShellScript\0.awsrunPowerShellScript\_script.ps1:4 char:12
$PasswordFile で指定したファイルが見つからない!というエラーですが、実際にはファイルは存在していました。また、SSM は指定した EC2 インスタンスで PowerShell を実行する際は SYSTEM アカウントを使います。ファイルに SYSTEM アカウントからの読み取りが許可されていないのかな?とも思いましたが、権限にも問題ありません。不思議なことに、RDP で当該 EC2 インスタンスにログインして同じように PowerShell を実行すると問題なく成功します。異なるのは、実行方法と実行ユーザくらいです。
で、いろいろ調べてみたり AWS サポートに問い合わせてみたりした結果、パスワードファイルの作り方に問題があったことがわかりました。
以下の Web ページの記述でそれが確定しました。
| If an encryption key is specified by using the Key or SecureKey parameters, the Advanced Encryption Standard (AES) encryption algorithm is used. The specified key must have a length of 128, 192, or 256 bits because those are the key lengths supported by the AES encryption algorithm. If no key is specified, the Windows Data Protection API (DPAPI) is used to encrypt the standard string representation. |
Key も SecureKey も指定していないので DPAPI が使われていて、かつ DPAPI は暗号化したユーザ&コンピュータのみが復号できるという特徴があります。ConvertFrom-SecureString 実行時は上記オプション指定なしで、ローカルの Administrator ユーザで実行していました。なので、SYSTEM アカウントでは復号できず、先程のようなエラーになったようです。
どのように対応したか?
パスワードファイルを SYSTEM アカウントで作成することにしました。
SYSTEM アカウントで作業するには、以下の PsExec を使いました。
以下のように実行すると、別ウィンドウが SYSTEM アカウントとして開くので、そこでパスワードファイル作成のコマンドを実行しました。
.\PsExec.exe -i -s powershell.exe
これで再度 SSM Automation を実行すると、無事成功して AD にユーザオブジェクトが作成されました!
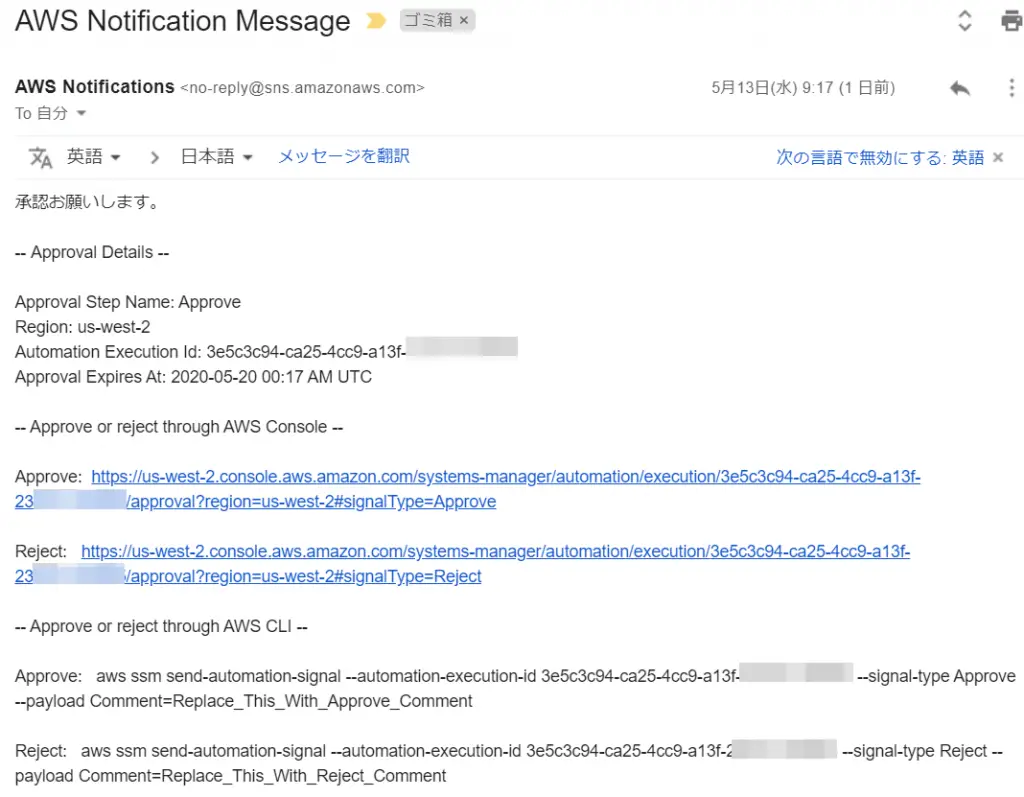
ちなみに、承認メールは以下のような内容で送信されます。
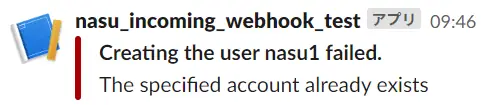
Slack への通知内容は、AD オブジェクト作成に成功したら↓こちらのように、

失敗したら↓このように簡単にエラー内容がつきます。
この記事を書きながら思いついた別の案
ここまで書いておいてアレですが、パスワードファイルがなくならないようにしたり漏洩したりしないようにすることを考えると、パスワードを Secrets Manager か SSM Parameter Store に保存した方が都合がいいことに気づきました。EC2 インスタンスにアタッチする IAM ロールで正しくポリシーが設定されていれば、複数台の EC2 インスタンスがあっても同じ情報を使えますし、メンテナンスでも PsExec を使わなくても済むので、こちらの案の方が運用しやすいと思います。
さいごに
SSM Automation を使うと、今まで手作業でやっていたことを自動化することができるかもしれませんね。すべての手作業が自動化できるとは限りませんが、もし自動化できるようなタスクであれば挑戦してみてはいかがでしょうか?
ただ SSM Automation に限りませんが、自動化されたものも完璧なものではないと思いますので、いざという時は手作業で同じことができるように手順書も準備しておきましょう。そうすることで、何が起きても慌てずに運用することができますよ。
- カテゴリー

この記事をシェアする